• Find My Drone

15 Drone Photography Tips for Stunning Aerial Shots

Updated

By Paul Posea

15 Drone Photography Tips for Stunning Aerial Shots - drone reviews and comparison

Drone Photography Timing: When to Fly for the Best Light

Aerial drone photograph of a lake at golden hour with soft warm light
Golden hour light transforms aerial shots. The low sun angle creates long shadows and warm tones that midday light can't replicate.

Light quality is the single biggest variable in aerial photography, and it changes dramatically based on time of day. Midday sun creates flat, overexposed scenes with harsh shadows. Golden hour and blue hour produce the soft, directional light that makes aerial shots look professional.

Golden hour: the 45-minute window

Golden hour refers to roughly 30 to 45 minutes after sunrise and before sunset. During this window, the sun is low enough that light travels through more atmosphere, softening it and shifting it toward warm orange and gold tones. Shadows become long and directional, adding depth to flat terrain. Landscapes, coastlines, and agricultural fields look dramatically better in golden hour than at any other time. The tradeoff: you have limited time to shoot before the light changes, so plan your shots in advance.

Blue hour for cooler, more dramatic results

Blue hour occurs roughly 20 to 30 minutes before sunrise and after sunset. The sky transitions through deep blue tones, and artificial lights (city streets, building windows) start to appear. This combination of ambient blue light and warm artificial lighting creates contrast that works well for urban aerial shots. Exposure times are longer in blue hour, so keep your ISO low and use a slower shutter speed rather than bumping ISO above 200.

Overcast days for even light

An overcast sky acts like a giant softbox. Harsh shadows disappear, and colors look saturated rather than washed out. For architectural photography and real estate, overcast conditions often produce cleaner results than direct sun. Wind tends to be calmer on overcast days too, which means smoother footage. The sky itself is less interesting (no dramatic clouds), so keep it out of the frame or minimize it.

Scout locations before you fly

Flying to a location and figuring out compositions on the spot wastes battery and misses the best light. Scout in advance using Google Earth: zoom to altitude, look for natural leading lines (roads, rivers, coastlines), identify the direction the light will come from, and plan 3 to 4 specific shots before you leave. For golden hour work, use the free PhotoPills app or The Photographer's Ephemeris to see exactly where the sun will be at your target location on any date. Check airspace using the B4UFLY app at the same time. A 20-minute pre-flight planning session on Google Earth consistently produces better results than arriving cold and improvising.

Tip: Use the free app PhotoPills to pre-plan the exact direction and angle of golden hour light at any location. The augmented reality view lets you see where the sun will be before you drive out to the site.

Camera Settings for Drone Photography

Auto mode is convenient, but it creates inconsistent results and limits what you can recover in post-processing. Understanding manual exposure settings lets you match the camera's output to what you actually see at the location.

ISO: keep it as low as possible

ISO controls the camera sensor's sensitivity to light. Higher ISO values brighten the image but introduce digital noise, which looks like grain or colored speckles in darker areas of the frame. For drone photography, the goal is ISO 100 in bright conditions and no higher than ISO 400 even in low light. Going above ISO 400 on most DJI cameras produces noise that is difficult to clean up in post-processing. If you need more light, slow your shutter speed rather than raising ISO.

Shutter speed: the 180-degree rule for video, 1/500s+ for photos

For video, the standard is the 180-degree shutter rule: set your shutter speed to double your frame rate. If shooting 30fps, set shutter to 1/60s. If shooting 60fps, set to 1/120s. This creates natural motion blur that matches how human vision perceives movement. For photos, use at least 1/500s while the drone is moving to eliminate blur. When hovering stationary, 1/250s is acceptable. Slower shutter speeds during photos create smearing even with a stabilized gimbal.

Aperture: only on certain drones

Most consumer drones have a fixed aperture and cannot adjust it. The DJI Mini 4 Pro, Mini 5 Pro, and Air 3S all have fixed apertures. The DJI Mavic 4 Pro has a variable aperture (f/2.8 to f/11), which gives you control over depth of field and exposure without changing ISO or shutter speed. If your drone has a fixed aperture, you control exposure exclusively through ISO and shutter speed, supplemented by ND filters.

White balance: manual Kelvin settings by condition

Auto white balance shifts during flight as the drone moves between different lighting conditions, creating inconsistent color across a sequence. Set white balance manually: 3,200 to 4,000K for sunrise and sunset, 5,500K for midday daylight, 6,500K for overcast skies, and 4,800K for blue hour. These are starting points. Shoot RAW and you can adjust white balance precisely in post-processing without quality loss.

ND Filters: Why You Need Them and Which to Buy

Aerial drone photo of violet flower fields with a road running through the landscape
ND filters allow longer shutter speeds in bright conditions, enabling the motion blur needed for smooth video and proper exposure control for photos.

ND (neutral density) filters are like sunglasses for your drone's camera. They reduce the amount of light entering the lens, allowing you to use slower shutter speeds in bright conditions. For video, this is essential for achieving the 180-degree shutter rule in daylight: without ND filters, you'd need to shoot 30fps at 1/60s, which is far too slow for the amount of light available outdoors.

Which ND values to carry

ConditionND FilterEffect
Heavy overcast, dawn/duskND4Reduces light by 2 stops
Partly cloudyND8Reduces light by 3 stops
Bright sunND16Reduces light by 4 stops
Very bright / midday reflective surfacesND32Reduces light by 5 stops

Freewell kits for specific DJI drones

The easiest approach is buying a drone-specific ND filter kit that includes ND4, ND8, ND16, and ND32 filters. Freewell makes kits for most DJI models (Mini 3, Mini 4 Pro, Mini 5 Pro, Air 3S, Mavic 4 Pro) for $40 to $80. The filters clip onto the lens housing without tools. A single kit covers most shooting conditions.

How to choose the right filter on location

Set your shutter speed to double your frame rate (180-degree rule). If the exposure is too bright with that setting, add an ND filter. Start with ND8. If still too bright, switch to ND16. Check your histogram: you want the exposure graph pushed toward the right without clipping the highlights (shown as spikes at the far right of the graph). On the DJI Fly app, enable histogram display in camera settings.

Drone Photography Composition: Rules That Work from the Air

Standard photography composition rules apply to aerial work, but perspective changes how you use them. The drone's height and the top-down view create visual relationships that don't exist at ground level.

Rule of thirds and gridlines

The rule of thirds divides the frame into a 3x3 grid. Placing your main subject (a building, a bend in the river, a mountain peak) at one of the four intersection points creates more visual tension than centering it. Enable the grid overlay in the DJI Fly app under camera settings. It displays directly on the live view while you fly. Keep the horizon on the upper or lower third line, not through the center of the frame.

Leading lines draw the viewer through the frame

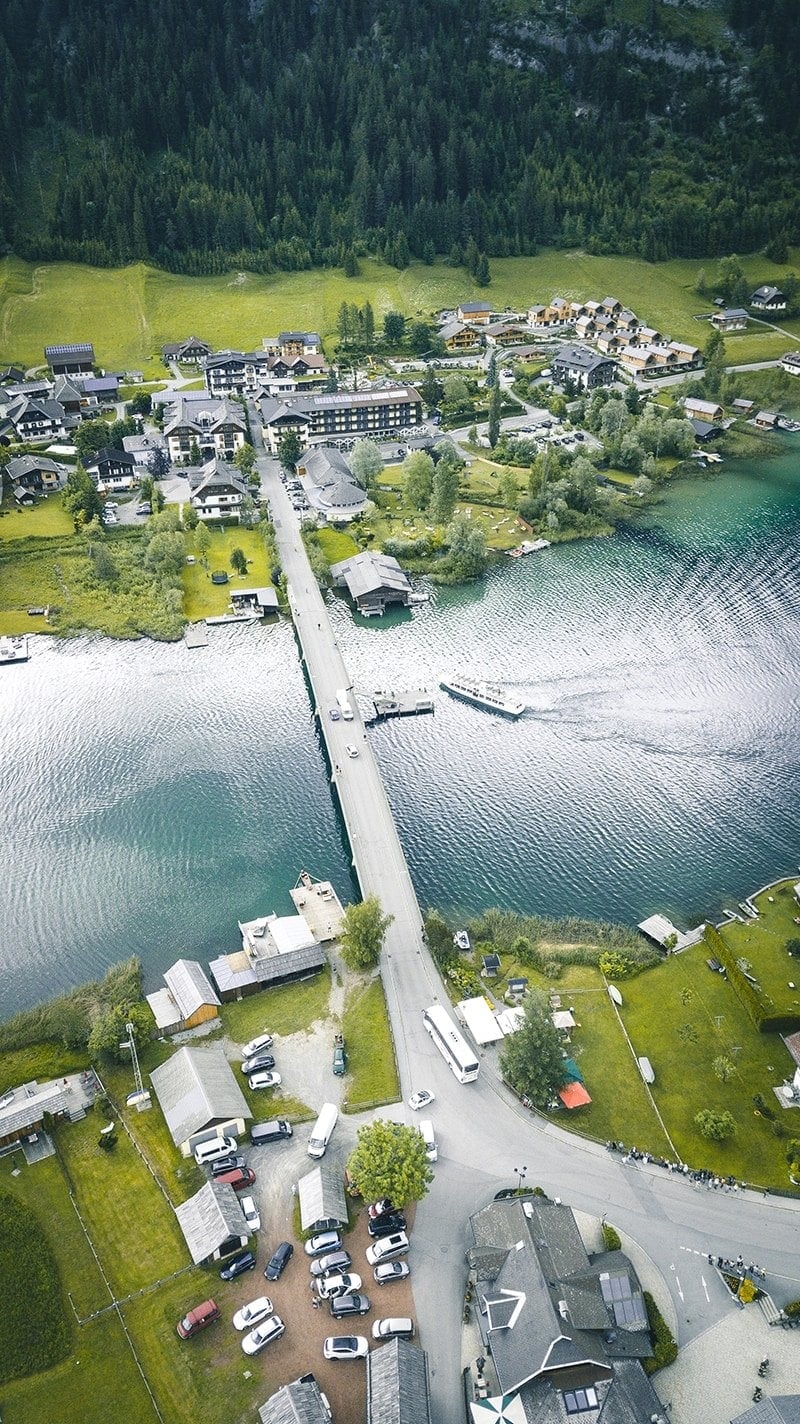
Roads, rivers, fences, coastlines, and train tracks are natural leading lines. From altitude, these lines often run across the entire frame and guide the viewer's eye from one edge toward your subject. Flying along a road rather than perpendicular to it creates a dynamic sense of movement. A single S-curve road through an agricultural field is a more interesting aerial composition than the field by itself.

Top-down (nadir) shots for abstract patterns

Pointing the camera straight down produces nadir shots: images where the scale reference is removed and the scene reads as pure pattern and texture. Parking lots, beaches with wave patterns, crop circles in fields, rooftops with HVAC geometry, and forests with defined paths all produce strong nadir images. In DJI Fly, tilt the gimbal pitch dial all the way down to get the straight-down angle. This is one of the few shot types that is uniquely aerial: no ground-based camera can replicate it.

Use Tripod or Cine mode for smooth low-altitude shots

DJI drones include a Tripod mode (also called Cine mode on some models) that limits maximum speed to around 3 to 4 mph. At slow speeds, stick inputs become ultra-smooth and the drone holds position much more precisely. This is the most practical setting for low-altitude photography (under 30 meters) where small movements have a large visual impact. Enable it from the flying mode selector in DJI Fly. For photos, use it when hovering for a stationary shot. For video, use it for slow pull-back reveals and orbit shots where you want cinematic precision.

Add a scale reference to convey depth

One of the most common weaknesses in aerial photography is that everything looks abstract from altitude. Including 1 to 3 people, a vehicle, or a boat in the frame immediately gives viewers a sense of scale that makes the scene feel real rather than like a satellite image. This is particularly effective for landscape and real estate shots where the goal is to communicate size. Ask someone to stand at the edge of a property, walk along a path, or sit on a dock. Their presence transforms a good aerial shot into a compelling one.

Vary your altitude intentionally

Different altitudes create very different compositions from the same location. At 30 meters, context is visible and subjects are still recognizable. At 100 meters, patterns and relationships between elements emerge. At 120 meters (the FAA limit without a waiver), landscapes become abstract. Shoot at multiple altitudes during each session. The shot that works best is rarely predictable from the ground.

Shoot RAW and Post-Processing Basics

JPEG files are processed and compressed in-camera. What you see is what you get, and you can't recover much in editing. RAW files contain the full sensor data with no compression. They look flat and dull straight out of camera, but they have 2 to 3 extra stops of recoverable detail in the highlights and shadows.

Enabling RAW on DJI drones

Most DJI cameras shooting photos can save in RAW (.DNG format) or RAW+JPEG simultaneously. In DJI Fly, go to camera settings and change the photo format from JPEG to RAW or RAW+JPEG. The RAW+JPEG option is useful while you're learning: you get the shareable JPEG immediately and the editable RAW for any shot worth processing carefully. RAW files are larger (15 to 25MB each vs. 4 to 8MB for JPEG), so carry a fast, high-capacity SD card.

Basic RAW processing workflow in Lightroom

A standard aerial RAW edit uses these starting slider values, then adjusts to taste:

SliderStarting ValueWhat It Does
Highlights-20 to -30Recovers detail in bright sky and clouds
Shadows+40 to +60Reveals detail in dark foreground
Vibrance+15 to +25Boosts muted colors without over-saturating skin tones
Clarity+10 to +20Sharpens midtone texture (foliage, rooftops, water)
Sharpening+50 to +70Compensates for slight softness from atmospheric haze

Apply lens correction under the Lens Corrections panel, DJI drone profiles are included in Lightroom's built-in library. This corrects barrel distortion and vignetting in one click. Set the white balance manually using the temperature slider rather than using the eyedropper (the eyedropper often picks the wrong reference point on aerial shots with mixed terrain). Once you have a baseline you like, sync it across all images from the same session using Lightroom's Sync Settings feature.

D-Log and color profiles for video

For video, shooting in D-Log (DJI's flat color profile) preserves more dynamic range at the cost of a washed-out image that requires color grading. D-Log is worth using only if you plan to color grade in post-processing using DaVinci Resolve or Premiere Pro with a LUT (lookup table). DJI provides free LUTs for D-Log footage on their website. If you're delivering straight to a client without grading, use the Normal or D-Log M profile (D-Log M has less dynamic range but looks usable out of camera).

Tip: If your drone supports it, enable AEB (Auto Exposure Bracketing) for landscape shots. AEB captures 3 to 5 frames at different exposures automatically. In Lightroom, merge them into an HDR image that contains detail in both the bright sky and the dark foreground. The DJI Mavic 4 Pro and Air 3S both support AEB shooting.

FAQ

For photos: ISO 100-200, shutter speed 1/500s or faster while moving (1/250s hovering), and white balance set manually (not auto). For video: use the 180-degree shutter rule (shutter speed = 2x frame rate), ISO 100-200, and add ND filters to achieve proper exposure with that shutter speed. Shoot RAW for photos whenever possible.

A 4-pack covering ND4, ND8, ND16, and ND32 handles most conditions. ND4 for overcast, ND8 for partly cloudy, ND16 for direct sun, and ND32 for very bright midday conditions or reflective surfaces. Freewell makes drone-specific kits for most DJI models for $40 to $80.

Golden hour (30 to 45 minutes after sunrise and before sunset) produces the best light for most subjects. The low sun angle creates directional light with long shadows that add depth. Blue hour (20 to 30 minutes before sunrise and after sunset) works well for urban shots. Overcast days are ideal for architectural and real estate photography because light is even with no harsh shadows.

RAW whenever you plan to edit. RAW files preserve 2 to 3 extra stops of dynamic range in highlights and shadows that JPEG compresses away. This matters most for high-contrast scenes (sky plus dark ground). If you're just sharing directly to social media without editing, JPEG is fine. RAW+JPEG mode captures both simultaneously for the best of both options.

Use a shutter speed of at least 1/500s while the drone is in motion. When hovering stationary, 1/250s is generally acceptable. Avoid raising ISO above 400 (digital noise at high ISO reduces apparent sharpness). Ensure the drone is hovering steady before triggering the shutter, DJI drones stabilize more precisely when they've had a few seconds to settle in position.

The 180-degree shutter rule means setting your shutter speed to double your frame rate. At 30fps, use 1/60s. At 60fps, use 1/120s. This creates natural motion blur that matches how human eyes perceive movement. Without it, video looks unnaturally sharp and jittery. ND filters are necessary to achieve this in bright conditions without overexposing.

A nadir shot is taken with the camera pointing straight down (90 degrees perpendicular to the ground). From altitude, nadir shots remove all scale reference and reveal patterns and textures that are invisible from the ground: crop rows, wave patterns on beaches, rooftop geometry, forest canopy structures, and road intersections. In DJI Fly, tilt the gimbal pitch all the way down to achieve the nadir angle.

Adobe Lightroom is the standard tool for RAW drone photo editing. A basic edit starts with correcting white balance, pulling down highlights (-50 to -70) to recover sky detail, lifting shadows (+20 to +40) to reveal foreground detail, and adding lens correction (DJI profiles are in Lightroom's built-in lens library). Apply a consistent preset across photos from the same session to maintain color consistency.

Paul Posea

Paul Posea

Author · Dronesgator

Paul Posea is the founder of Dronesgator and has been reviewing and comparing drones since 2015. With a Part 107 certification, 195 YouTube drone reviews, and published work on Digital Photography School, he combines hands-on flight testing with data-driven analysis to help pilots find the right drone.