• Find My Drone

How to Fly a Drone for Beginners: Step-by-Step Guide

Updated

By Paul Posea

How to Fly a Drone for Beginners: Step-by-Step Guide - drone reviews and comparison

Before Your First Drone Flight: Legal Requirements and Gear Prep

Before you fly, there are three things the FAA requires of recreational pilots in the US. They take about an hour total and are not optional.

FAA registration

Any drone weighing 0.55 lbs (249g) or more must be registered with the FAA. Registration costs $5 and is valid for 3 years. You register at FAA DroneZone, receive a registration number, and must display it on the drone. The DJI Mini 4 Pro comes in at exactly 249g and requires registration. The original DJI Mini 3 is 248.5g and technically does not, though registering voluntarily is not a bad idea since it takes 10 minutes. If your drone is under 250g, you still need to pass the TRUST test.

The TRUST test

The Recreational UAS Safety Test (TRUST) is a free online safety test required for all recreational pilots, regardless of drone weight. It takes about 30 minutes and you cannot fail: it is educational rather than scored. Take it at an FAA-accepted provider and keep the completion certificate on your phone when flying. Most pilot apps (DJI Fly, Aloft) let you store it in the app.

Remote ID

All registered drones sold after September 2023 are required to broadcast Remote ID: a real-time signal that identifies the drone and the pilot's location. DJI drones sold since late 2023 have Remote ID built in and enabled by default. If your drone predates this requirement, you need either a Remote ID broadcast module or an FAA-approved Remote ID declaration (limited to a fixed flying site you register with the FAA). Check your specific model's Remote ID status in the DJI Fly app under safety settings.

Battery and gear prep

Charge your drone battery and controller battery fully the night before. Consumer LiPo batteries reach 100% charge in 60 to 90 minutes via the charging hub. Store batteries at around 50% charge when not flying for more than a few days: most DJI batteries have a self-discharge feature (called auto-discharge or battery management mode) that will bleed down to 60% storage charge automatically after about 10 days if you do not fly. For your first flight, also charge your phone and download the DJI Fly app or the relevant control app before you leave home, not in the field.

How to Fly a Drone: Controls Explained

Consumer GPS drones use a two-stick controller. Both sticks spring back to center when released. Understanding what each stick does is the foundation of every flight.

Left stick: throttle and yaw

Pushing the left stick up increases throttle and makes the drone climb. Pushing it down reduces throttle and makes the drone descend. In GPS mode, the drone holds its altitude automatically when you release the stick. Pushing the left stick left rotates the drone counterclockwise (yaw left). Pushing it right rotates the drone clockwise (yaw right). Yaw changes the direction the drone is facing without moving it horizontally.

Right stick: pitch and roll

Pushing the right stick forward (up) moves the drone in the direction it is currently facing. Pushing it backward (down) moves it away from you. Pushing it left or right moves it laterally in that direction (strafe). The key point: pitch and roll are relative to the drone's nose, not to you. If the drone is facing left and you push the right stick forward, the drone moves left from your perspective. This is the source of most beginner confusion, and it gets addressed in the skill progression section.

The most important safety fact for beginners

In GPS mode, releasing both sticks completely causes the drone to stop moving and hover in place. If you panic or lose orientation mid-flight, the correct response is to let go of everything. The drone will not fall. It will hold its position and altitude until you are ready to act. This single fact removes most of the anxiety from first flights. GPS mode is specifically designed to be forgiving of momentary loss of control.

GPS mode vs. manual mode

Start in GPS mode, every time. In GPS mode, the flight controller uses GPS and barometric sensors to hold position when you release the sticks. The drone stabilizes itself and resists wind. In Attitude mode (sometimes called Sport mode or Manual mode), the GPS hold is disabled: the drone drifts with wind and does not self-level when you release the sticks. Attitude mode requires smooth stick input and constant correction. It is not for beginners. Stick with GPS mode until hovering and directional flight feel completely natural.

Return to Home

Most consumer GPS drones have a Return to Home (RTH) function that brings the drone back to its takeoff location automatically. Before your first flight, test RTH at low altitude (10 to 15 feet) so you understand how it works in practice. RTH climbs to a pre-set altitude (often 30 meters by default) before flying home, which can be an issue if there are trees between you and the drone. Check and set your RTH altitude before takeoff.

Your First Drone Flight: Step by Step

DJI drone with propeller guards installed for beginner flying safety
Propeller guards are worth using on your first several flights. They reduce the damage from minor bumps and collisions while you build stick control. Most DJI beginner drones include them, and aftermarket guards are available for larger models.

For your first flight, choose a large open field with no trees, overhead power lines, or other people. The field should be at least 100 feet in every direction from your takeoff point. Wind below 10 mph is ideal for a first flight; check the UAV Forecast app or a local weather station, not just the general forecast. Most consumer GPS drones can hold position in winds up to 20-25 mph, but at that level the drone is working against the wind rather than flying freely, and you will see it crabbing and fighting to hold position. For a first flight, aim for conditions where you can barely feel the wind on your face. Once you have 5-10 sessions of experience, 15 mph becomes manageable.

Startup sequence

Power on the controller first, then the drone. Wait for the GPS lock indicator in your app to show at least 6 satellites before arming. Calibrate the compass if the app prompts you to (most DJI drones will ask on first power-on at a new location). Watch the arm LED colors: slow green blinking means GPS lock and normal flight mode. Do not take off until you have a GPS lock.

Takeoff and first hover

Use the drone's auto-takeoff button for your very first flight: it lifts to 4 feet and holds. Once airborne, resist the urge to do anything. Just watch the drone hover at 4 to 6 feet for at least 60 seconds. Notice how it handles minor wind. Make a tiny right-stick adjustment to see how it responds. Release the stick and watch it stabilize. This is the most useful thing you will do in your first flight session.

First directional movement

After a stable hover, push the right stick forward slowly and move the drone 20 feet ahead of you. Stop. Let it stabilize. Pull the stick back and return to your starting position. Do this 5 to 10 times before adding any other movement. Then try left and right. Then try yaw (left stick left and right). Keep everything slow and deliberate.

Landing

Use the auto-land function for your first several flights: it descends slowly and cuts power at ground contact. When landing manually, reduce throttle very slowly. When the drone is 1 to 2 inches off the ground, cut the throttle completely with a quick down-input on the left stick. Never try to catch a landing drone with your hands: propellers spin fast enough to cause serious cuts even on small consumer models.

Beginner Drone Skill Progression for Your First Month

Drone simulator app on a mobile device for practicing before first flight
Flight simulator apps let you build stick control without risking the drone. DJI Flight Simulator and apps like Liftoff give you realistic physics in a safe environment. Use one before your first real flight.

Rushing skill development is the most common mistake experienced pilots see in beginners. Each skill below builds on the previous one. Do not advance until the current step feels automatic, not just possible.

Week 1: Hover and basic directions

Goal: hold a steady 6-foot hover for 2 minutes without any GPS drift correction from you. Then move forward, backward, left, and right in isolation, returning to the hover point after each. Repeat until each direction feels predictable. End each session with 5 precision landings on a marked target (a folded jacket works). Landing accuracy builds the stick sensitivity you will need for everything else.

Week 2: Yaw and the square pattern

Add yaw to hovering: rotate 90 degrees, pause, 90 more, pause, until you have completed a full 360. Then fly a square: move forward 30 feet, strafe right 30 feet, backward 30 feet, strafe left 30 feet, returning to start. This builds combined stick control and spatial awareness of where the drone is.

Week 3: Nose-in orientation

This is the skill that trips up most beginners. When the drone faces toward you, left and right appear reversed from your perspective. The right stick still moves the drone in the direction its nose points, but that is now toward you. Practice: hover with the drone facing you and make small left/right corrections to keep it in place. Start at 20 feet where you have reaction time. This is the most important intermediate skill because you will encounter nose-in orientation in any circular or returning flight path.

Week 4: Circle and figure-8

Flying a circle: combine right-stick roll with yaw to fly in a circle around yourself while keeping the nose pointing outward (or inward). This requires coordinating both sticks simultaneously. The figure-8 combines two circles and requires switching yaw direction mid-pattern. These patterns build the foundation for cinematic orbit shots. By this point you have also built enough stick intuition to start exploring intelligent flight modes (Circle, Orbit, Waypoints) with an understanding of what the automation is actually doing.

Common Beginner Drone Mistakes

These mistakes account for the majority of beginner incidents, crashes, and lost drones. Knowing them in advance is the fastest way to avoid them.

Not checking airspace before flying

Airspace awareness is not optional. The FAA's B4UFLY app shows restricted zones, controlled airspace requiring LAANC authorization, and TFRs in real time. Flying in Class B, C, or D airspace near an airport without LAANC authorization is a federal violation. Install B4UFLY or the Aloft app and check before every flight at a new location, including parks, beaches, and open fields that might seem obviously legal but are not.

Flying until the battery is critically low

Land at 25% battery remaining, not when the low-battery warning triggers. The low-battery warning is a prompt to land soon, not a cue that you have a few more minutes. At 10% battery, most DJI drones initiate emergency landing automatically wherever they are, which may be over water, a road, or someone's roof. The 25% rule gives you buffer for wind, an unexpected maneuver, and the time needed to descend from altitude safely.

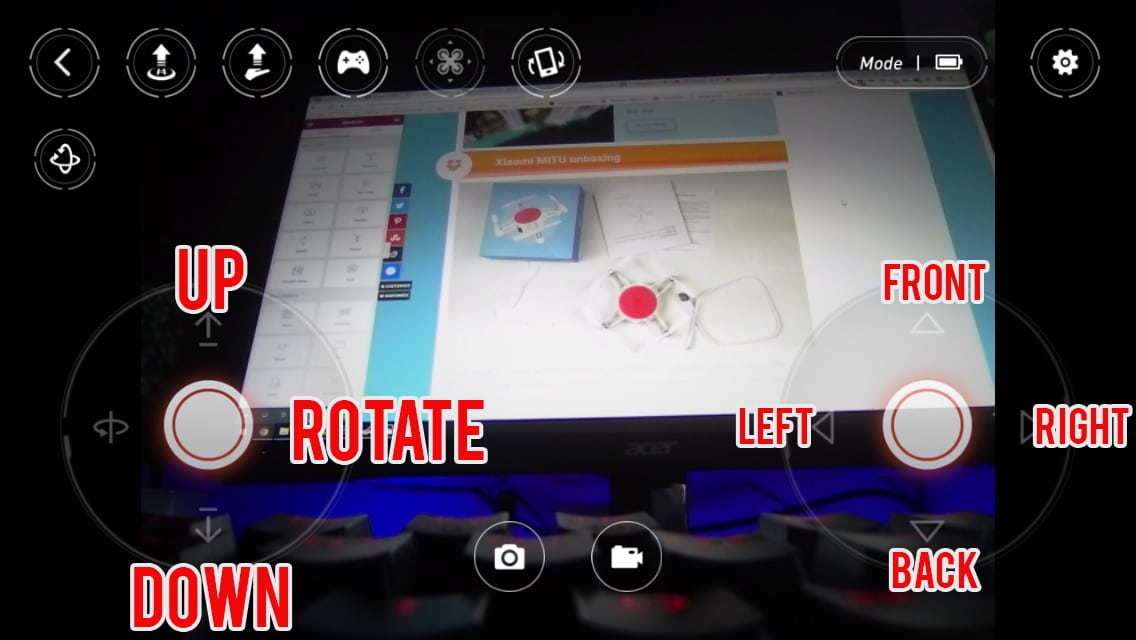
Overcontrolling the sticks

New pilots tend to push sticks to their full range, then overcorrect in the other direction, creating oscillations. In GPS mode, small inputs are all you need. Practice stick sensitivity at low altitude by making the smallest adjustment that produces a visible response, then releasing. The drone will settle on its own. Train yourself to use 10 to 20% of the stick range for normal flight, not 80%.

Advancing too fast to autonomous features

QuickShots, ActiveTrack, and Waypoints are useful tools, but relying on them before building manual skill means you cannot recover when something goes wrong. Autonomous modes fail: GPS interference, unexpected obstacles, and connectivity drops all create situations where you need to take manual control immediately. Pilots who built manual skill first handle these moments calmly. Those who jumped straight to autonomous features often panic.

Tip: Use a flight simulator app before your first real flight. DJI Flight Simulator (Windows) and Liftoff (mobile) give you realistic physics and the actual DJI controller interface. Twenty minutes in a simulator will make your first real hover session noticeably smoother.

FAQ

Consumer GPS drones are genuinely beginner-friendly. In GPS mode, the drone holds its position when you release the sticks, compensates for minor wind, and returns home if you lose the signal. Most beginners can achieve a stable hover and basic directional flight in their first session. The harder skills (nose-in orientation, manual control, cinematic moves) take several weeks of practice to feel natural.

Recreational pilots do not need a Part 107 license. You do need to register your drone with the FAA if it weighs 0.55 lbs (249g) or more ($5, valid 3 years), pass the free TRUST safety test, and ensure your drone has Remote ID compliance. If you plan to fly for any commercial purpose (paid photography, client work, social media with sponsorships), you need a Part 107 certificate.

The DJI Mini 4 Pro is the most popular beginner choice: under 250g, solid camera quality, excellent GPS stability, and enough intelligent flight modes to grow into. The DJI Neo and DJI Neo 2 are even easier to start with and significantly cheaper. For very young beginners or indoor practice, a small toy drone under $50 (Holy Stone HS420, for example) lets you build hand-eye coordination without worrying about the cost of a crash.

A large open field with no trees, power lines, or people within 100 feet in every direction. Parks can work but check local ordinances first (many city parks prohibit drones). Athletic fields, empty parking lots early in the morning, and rural agricultural land are all reliable practice spots. Avoid beaches near airports, populated areas, and any location within 5 miles of an airport unless you have LAANC authorization.

Basic competence (stable hover, directional flight, safe landing) comes in 1 to 3 flight sessions for most beginners with a GPS drone. Intermediate skills like nose-in orientation and coordinated patterns take 2 to 4 weeks of regular practice. Smooth cinematic control and manual flight in challenging conditions are months-long pursuits. The progression is faster than most people expect for the basics and slower than most expect for true mastery.

Find a large open field, power on in sequence (controller first, drone second), wait for GPS lock, take off to 4 to 6 feet, and hover in place for at least 60 seconds without touching the right stick. This single step builds more useful instinct than any amount of reading. Make tiny directional movements, land, repeat. Treat the first session as a stability test and control orientation exercise, not a photography session.

In GPS mode, make sure you have GPS lock (at least 6 satellites) before takeoff. Compass calibration errors cause significant drift: recalibrate the compass when the app prompts you, and always do so at a new location. Mild wind drift in GPS mode is normal and corrects with small stick inputs. If the drift is severe in GPS mode with good satellite count, the compass or IMU may need calibration or the sensors may be obstructed.

Yes, especially if you are starting with an expensive drone. DJI Flight Simulator (Windows, free with DJI controller) replicates the DJI Fly app interface and controller feel with realistic physics. Twenty minutes in a simulator before your first real flight will make your hover session noticeably calmer. Simulators are also the best way to practice nose-in orientation and figure-8 patterns without the risk of a real crash.

Paul Posea

Paul Posea

Author · Dronesgator

Paul Posea is the founder of Dronesgator and has been reviewing and comparing drones since 2015. With a Part 107 certification, 195 YouTube drone reviews, and published work on Digital Photography School, he combines hands-on flight testing with data-driven analysis to help pilots find the right drone.