A drone that won't take off is almost never broken. The most common causes are a battery that shipped from the factory in hibernation mode, propellers installed on the wrong motors, or a geofenced location blocking the arms. All three are fixable in minutes.
The useful diagnostic split is this: motors that won't spin at all point to a power, pairing, or software block. Motors that spin but don't generate lift point to a propeller or motor problem. Those two failure modes have different causes and different fixes, and knowing which one you have gets you to the solution faster.
This guide covers every reason a drone won't take off in order from most to least common, with step-by-step fixes for each. Most takeoff failures are resolved by step 3 or 4.
Check the Battery Before Anything Else
3.0Vhibernation trigger per cell
10%DJI hibernation threshold
50%minimum for firmware updates
Hibernation Mode on New Batteries
New DJI batteries often ship in hibernation mode. The factory sets them below 10% charge to prevent degradation during shipping and storage. A hibernating battery shows no LED response or flashes briefly then goes dark. It looks dead. It is not.
To wake it: connect directly to the wall charger (not a hub, not a power bank) and leave it undisturbed for 20 to 60 minutes. Do not unplug and replug repeatedly. Just leave it. The LEDs will eventually activate and charging will begin normally. Batteries stored for more than three months without charging can enter the same state.
The charging hub cannot wake a hibernating battery. Connect the battery directly to the OEM wall charger and leave it for at least 30 minutes before assuming it is dead.
Charge Level and Cold Weather
Both the drone battery and the controller battery need to be charged. The controller is the part pilots most often forget. If the RC has less than two LED bars, the drone may arm but immediately land or refuse flight commands.
Cold weather reduces LiPo discharge capacity significantly. Below about 10C (50F), some DJI drones show a battery temperature warning and restrict takeoff. The fix is to warm the battery to room temperature before flying. After powering on in cold conditions, hover at 1 meter for 1 to 2 minutes to let the battery warm through use before climbing.
Battery Seating
The battery must click fully into the drone. A battery that is even slightly unseated disconnects power. Press firmly until you hear and feel the latch engage. On some DJI models (Mini 3 Pro, Mini 4 Pro), the latch is a small lever on the back of the battery bay that must click into the slot on the battery itself.
Propeller Fixes When Your Drone Won't Lift Off
Incorrect prop installation is one of the most common reasons a drone flips instead of lifting off.
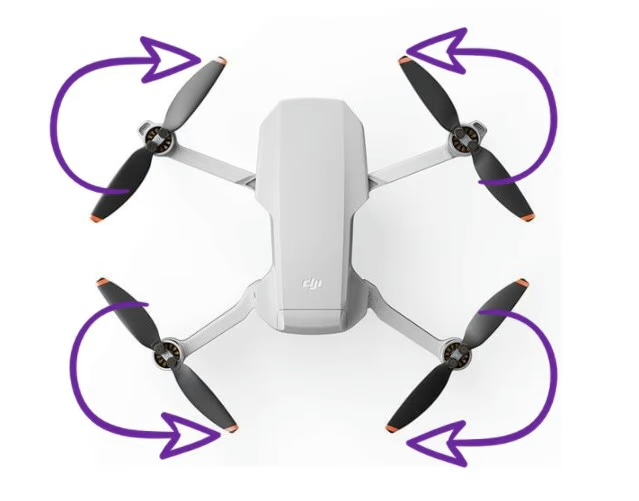
CW and CCW Propellers: The Installation Rule
DJI and most GPS drones use two types of propellers: clockwise (CW) and counter-clockwise (CCW). They are not interchangeable. CW props are marked with a small dot or colored ring near the center hub. They go on CW motors, which are also marked. CCW props go on the remaining two motors.
If CW and CCW props are swapped on any motor pair, the drone generates downward thrust on those arms instead of upward. The result is violent flipping or no liftoff at all. This is the most common cause of the "drone flips on takeoff" problem.
Tip: The dot-to-dot rule: the dot on the prop matches the dot on the motor shaft. If a motor has a dot, it gets the dotted prop. If neither has a dot, it gets the plain prop.
How to Check Propeller Installation
Each motor position has a fixed rotation direction. Installing the wrong prop type on any motor causes the drone to flip or fail to lift.
Power off completely. Remove all four props. Lay the drone on a flat surface and identify which two motors are CW and which two are CCW using the markings on the motor shafts. Re-install props matching dot to dot, then tighten each until it locks. DJI props use a twist-to-lock mechanism: press down and twist until the prop stops rotating freely.
Cracked or Loose Propellers
A hairline crack, chip, or warp on any prop blade creates asymmetric thrust. The drone tries to compensate through the flight controller but often cannot stabilize enough to climb. Inspect each blade by holding it at eye level and looking along its length for any curve, crack, or missing material. A bent prop will visually catch the light differently on each blade.
Props that feel loose after installation were not fully locked. Remove and reinstall, pressing down firmly before twisting. If a prop still spins freely by hand after installation, the lock mechanism may be stripped and the prop needs replacement.
Geofencing: The Drone Won't Take Off Near Airports
How DJI's GEO System Works
DJI's FlySafe GEO system marks airspace on the in-app map with color-coded zones. The map is loaded when you launch DJI Fly with a data connection. Red zones are Restricted Zones: hard blocks where motors will not arm regardless of certification. Yellow and blue zones are Authorization Zones: the motors arm after you acknowledge a warning and accept responsibility.
In January 2025, DJI updated the GEO system for the US to align with the FAA's LAANC framework. Most advisories now show warnings rather than hard blocks, placing legal responsibility on the pilot. A drone that silently refuses to arm near an airport is almost always hitting a GEO restriction.
How to Check and Resolve a Geofence Block
Open DJI Fly and connect to the drone before moving it.
Tap the map icon in the lower left of the camera view.
Look for red shading over your current position. Red means restricted: you cannot fly here without an FAA waiver.
Yellow or blue shading means authorization zone: tap the warning, read it, and acknowledge. The drone will arm.
If you are in a red zone, relocate at least 1 km (0.6 miles) in a direction away from the restricted area before attempting takeoff.
Note: The GEO map only loads with a live data connection. Flying in airplane mode or with mobile data off can prevent the map from updating. Connect before powering on the drone to ensure the map is current.
Requesting a FlySafe Unlock
For commercial flights in authorization zones, pilots with an FAA Part 107 certificate can request a permanent unlock at the DJI FlySafe portal. Upload your Part 107 certificate number and the unlock is applied to your DJI account. The drone will arm in that zone without an acknowledgment prompt once the unlock is active.
Calibration and Firmware Fixes for Drone Takeoff
A single faulty motor prevents stable takeoff. Visual inspection and the motor test in DJI Fly can identify the problem motor.
IMU and Compass Calibration
The IMU (Inertial Measurement Unit) measures the drone's attitude: tilt, rotation, and acceleration. If the IMU calibration data is off, the flight controller sees the drone as perpetually tilted and refuses to arm or immediately corrects into a crash. DJI Fly shows an IMU calibration warning in the Safety tab when this is needed.
The compass tracks magnetic heading. It loses calibration near large metal objects, power lines, rebar, or when flying in a geographically distant location from the last calibration. A compass error blocks takeoff on GPS-dependent drones.
IMU calibration: DJI Fly app, three-dot menu, Safety, IMU Calibration. Place the drone on a flat hard surface and follow on-screen rotation steps.
Compass calibration: DJI Fly app, three-dot menu, Safety, Compass Calibration. Take the drone outdoors away from vehicles, metal fences, and power lines. Rotate horizontally 360 degrees, then hold vertically and rotate 360 degrees.
Firmware Updates
DJI Fly updates automatically from the App Store or Google Play. When the app updates but the drone firmware has not been updated to match, the drone may refuse to arm with a version mismatch warning. Some firmware versions enforce mandatory updates before any flight.
To update firmware: connect both the drone and controller, open DJI Fly, and check the top of the main screen for an update banner. Updates require at least 50% battery on both devices. Do not disconnect anything during the update process. If the OTA update fails repeatedly, use DJI Assistant 2 on a Windows or Mac computer to force the update via USB.
GPS Lock and Beginner Mode
Most DJI drones require 6 to 8 GPS satellites before allowing takeoff. The satellite count is shown in the top of the DJI Fly camera view. Powering on under a tree canopy, indoors, or immediately after turning on (before satellites are acquired) prevents arming.
DJI Beginner Mode also enforces GPS lock as a prerequisite, plus limits altitude to 30 meters and distance to 30 meters. New pilots sometimes leave Beginner Mode enabled and confuse the GPS requirement for a hardware fault. To disable it: three-dot menu in DJI Fly, Safety, Beginner Mode toggle off.
Obstacle Avoidance Blocking Drone Takeoff
The Air 3S, Mini 4 Pro, Mavic 4 Pro, and other recent DJI drones with omnidirectional obstacle avoidance can refuse to arm when their proximity sensors detect an object too close. This commonly happens in three situations: powering on inside a car or transport bag, placing the drone on a table against a wall, or launching from a spot where the forward sensors see a fence or vehicle within a few meters.
If the drone arms briefly then immediately stops motors, or shows a sensor warning in DJI Fly before takeoff, move the drone to open ground at least 2 to 3 meters from any obstacle in all directions. Alternatively, temporarily set obstacle avoidance to Bypass mode: three-dot menu in DJI Fly, Safety, Obstacle Avoidance Action, then switch from Brake to Bypass for the launch. Reset to Brake after takeoff.
Note: Obstacle avoidance blocking takeoff is only relevant on drones with active forward and downward sensors. The DJI Neo, Mini 3, and budget non-obstacle-avoidance drones do not have this issue.
Motor Problems and Other Drone Takeoff Causes
Motor Inspection
With the drone powered off, spin each motor by hand. It should spin smoothly and freely with only light resistance. Any motor that catches, grinds, feels gritty, or will not spin at all is either damaged or has debris around the shaft.
Hair and string are the most common debris. A single strand of hair wrapped tightly around a motor shaft generates enough resistance to prevent the motor from reaching takeoff RPM. Remove the propeller, look at the motor shaft from above, and use tweezers to remove any wound material. On folding-arm drones, check the fold joints too: sand or debris in the joint can prevent the arm from fully opening and triggering a safety stop.
Tip: The motor test function in DJI Fly (Safety tab, Motor Test) spins each motor individually at low RPM. If one motor fails to spin or spins noticeably slower than the others, that motor or its ESC needs repair or replacement.
Controller Pairing
After a factory reset, a firmware update, or when using a replacement controller, the RC may need to be re-linked to the drone. An unlinked controller sends no arming commands. To re-link: in DJI Fly, go to Settings (three dots), then Aircraft Connection, then Pair to Aircraft. The drone beeps and LEDs roll when it enters pairing mode.
Cold Weather and the Warm-Up Hover
At temperatures below 10C (50F), LiPo batteries lose a significant portion of their rated capacity. The battery percentage shown in the app reflects stored charge, not the actual available power at low temperatures. The drone may refuse takeoff with a battery temperature warning, or take off and immediately trigger a low battery RTH.
The standard procedure for cold weather: after powering on, hover at 1 to 2 meters above the ground for 60 to 90 seconds before climbing. This warms the battery through load and brings it to operational temperature. Do not skip this even if the battery shows 100%.
FAQ
Motors spinning but no liftoff usually means the propellers are installed on the wrong motors (CW prop on CCW motor, or vice versa), propellers are loose and not locked, or one motor is significantly weaker than the others. Power off, remove all props, and reinstall carefully matching the dot markings. Check that each prop locks firmly and does not spin freely by hand.
The two most common causes for brand-new drones are a battery in hibernation mode and a first-run setup that was not completed. For hibernation: connect the battery directly to the wall charger (not a hub) and leave it for 20 to 60 minutes without unplugging. For setup: open DJI Fly, log in to your DJI account, and complete the first-run wizard including firmware check and return-to-home setup.
A drone that flips immediately on takeoff has propellers installed on the wrong motors. CW propellers generate downward thrust when installed on CCW motors, causing the drone to flip toward those arms. Power off, remove all four props, identify CW and CCW motor positions from the markings on the motor shafts, and reinstall matching dot to dot.
DJI Fly blocks takeoff for several reasons: geofenced location (check the map for red or yellow zones), firmware update required, insufficient GPS satellite count, IMU or compass calibration error, or battery temperature too low. The app should display a specific warning. Tap the red warning icon at the top of the camera view to see the active reason.
Yes. GPS drones have an ATTI (Attitude) mode that allows flight without GPS lock, though the drone will drift with wind and does not hold position. DJI drones can be forced into ATTI mode in some configurations. Budget WiFi-only drones (not GPS) always fly in ATTI mode. Beginner Mode on DJI drones requires GPS and will not allow flight without it.
Immediate landing after takeoff is almost always a low battery on either the drone or the controller, a battery temperature warning triggering return-to-home, or a calibration error detected mid-initialization. Check both battery levels before takeoff. If the battery is cold, do a slow warm-up hover at 1 meter before climbing.
Red zones on the DJI FlySafe map are hard restricted zones near airports, military installations, and similar locations. Motors will not arm in these zones without a special authorization. Yellow and blue zones are authorization zones where you can fly after acknowledging a warning in the app. Part 107 pilots can apply for unlocks at fly.dji.com/flysafe.
Use the motor test in DJI Fly (Safety tab, Motor Test) to spin each motor individually. A bad motor either fails to spin at all or spins noticeably slower than the others. Also spin each motor by hand with the drone powered off: a bad motor has grinding, catching, or significant resistance compared to the others. Bent motor shafts also create a wobble you can feel when spinning by hand.
Paul Posea founded Dronesgator in 2015 and has been reviewing consumer drones for over a decade. With 195 YouTube drone reviews drawing 3.55 million views and published work on Digital Photography School, he combines hands-on flight testing with data-driven analysis to help pilots find the right drone.
Marcus Taylor is a UK CAA certified drone pilot and owner of Deployed Consultancy Ltd. With 6 years of commercial experience spanning UN site surveys in West Africa, aerial photography across Europe, Africa, and Japan, and defence consulting, he verifies the technical accuracy of Dronesgator's drone reviews and guides.