• Find My Drone

How to Build a Drone: FPV Quadcopter Guide for Beginners

Updated

By Paul Posea

How to Build a Drone: FPV Quadcopter Guide for Beginners - drone reviews and comparison

Should You Build a Drone or Buy One?

What Building Gets You

Building a drone makes the most sense if you want to fly FPV (first-person view) with goggles, where the drone community around custom builds is large and the repair ecosystem is well-developed. You can replace a crashed arm for $3. You can swap a burned ESC without sending the whole drone to a service center. The community around FPV builds, including Oscar Liang, Joshua Bardwell, and the Betaflight Discord, is massive and genuinely helpful.

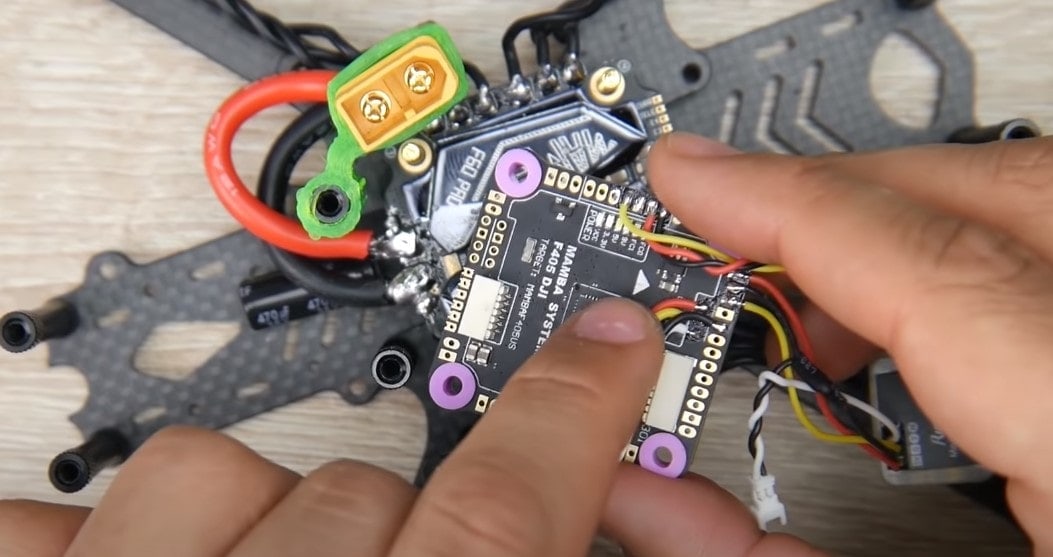
It also gets you into the hobby at a level that buying a DJI doesn't. You understand motor KV ratings, why 4-in-1 ESC stacks run cleaner than individual ESCs, and how Betaflight PID tuning works. That knowledge transfers.

When Buying Makes More Sense

If your goal is aerial photography with professional image quality, a DJI Mavic 4 Pro or Air 3S will produce better footage than anything you can build at a similar price point. DJI's camera systems, gimbal stabilization, and software integration are not replicable in a custom build at the consumer level. Custom FPV builds are fast and fun, but the camera is almost always secondary.

Build if you want FPV flying, durability through repairability, and community support. Buy a DJI if your primary goal is camera footage quality.

Realistic Cost Expectations

Build TierDrone OnlyFull Setup (with radio, goggles, batteries)
Budget analog (3.5-5 inch)$285-400$500-650
Mid digital (Walksnail / HDZero)$500-800$800-1,100
Premium digital (DJI O4)$800-1,200$1,200-1,800

These ranges assume buying individual components, not a kit. Kits (pre-selected parts from one vendor) cost more but reduce ordering complexity for first-timers.

Tip: If selecting individual parts feels overwhelming, pre-built kits like the Joshua Bardwell SE QAV-S 2 5-inch kit (available at GetFPV for ~$200-250 without electronics) are a middle option. The frame, motors, and FC are pre-chosen and tested to work together. You still solder and configure Betaflight, but the parts compatibility decision is handled for you.

What Type of Drone to Build

Quadcopter, hexacopter, and octocopter frame configurations
Quadcopters (4 motors) dominate the FPV hobby. Hexacopters and octocopters offer redundancy for professional use but are larger and more complex.

The 5-Inch Freestyle Build

The 5-inch freestyle quad is the standard starting point for beginners. The 5-inch prop size sits in a sweet spot: large enough for stable flight and good flight time, small enough to be portable. The parts ecosystem is the largest of any size class, which means the most tutorials, the most community support, and the most affordable replacement parts. Most Betaflight presets and PID tune baselines assume a 5-inch build.

Other Common Build Types

  • Micro/toothpick (2.5-3.5 inch): Lighter, indoor-capable, good for learning. Less wind resistance than a 5-inch. Lower crash damage and lower parts cost. Good second build.
  • Long-range (7 inch): Designed for extended range and efficient flight times rather than freestyle acrobatics. Uses ELRS long-range radio and efficient motor/prop combos. Harder to build correctly.
  • Cinematic (5 inch, heavy): Built for smooth footage with a proper camera mount. Uses Betaflight's cinematic mode settings and a GoPro or similar. More complex than a standard freestyle build.

Motor Specification Quick Reference

Build SizeMotor SizeBatteryKV Range
3.5 inch1505-18064S3000-4500 KV
5 inch (4S)22074S2400-2700 KV
5 inch (6S)2207-23066S1700-2200 KV
7 inch2806-31106S900-1300 KV
Note: Higher KV motors spin faster but generate less torque. 4S is more forgiving for beginners; 6S is more efficient for experienced pilots. Both are valid for a first build.

Parts List to Build a Drone

Core Components

A quadcopter has six major component categories. Every part in this list is required; nothing here is optional. The radio transmitter and goggles are separate from the drone itself but are needed to fly it.

ComponentWhat to Look ForBudget Range
Frame (5 inch)Carbon fiber, 30x30 or 20x20 FC mount, weight under 80g$15-60
4-in-1 ESC/FC StackF4 or F7 processor, 35-55A ESC rating, built-in gyro$50-120
Motors (x4)Match KV to battery voltage (see table above)$40-80 set
Propellers (spare packs)Match size to motor (e.g. 5148 or 5151 for 5 inch)$5-15 per pack
Radio ReceiverExpressLRS (ELRS) 2.4 GHz recommended; matches your transmitter protocol$15-30
FPV CameraAnalog: Foxeer, Caddx ($20-40). Digital: DJI O3/O4 unit ($200-400)$20-400
Video Transmitter (VTX)If analog: 200-400mW VTX ($20-40). Digital systems include VTX in unit.$0-40
LiPo Battery (x2-3)4S 1300-1800mAh or 6S 1100-1300mAh; 75C or higher discharge$20-40 each
ChargerToolkitRC, ISDT, or SkyRC; supports LiPo balance charging$20-60

Goggles and Radio Transmitter

Your radio transmitter and goggles are the most important purchases outside the drone itself. They last through multiple drone builds. Buy for the protocol: if you choose ELRS (recommended for beginners), your transmitter must support it. Radiomaster Pocket ($65) and Radiomaster Boxer ($110) are the common starting points. For goggles, DJI Goggles N3 ($199) or BetaFPV VR04 ($60 for analog) are typical entry-level choices.

For a curated parts list that is updated regularly, Joshua Bardwell's FPV Shopping List at fpvknowitall.com is the most-referenced community resource for 5-inch freestyle builds. He updates it when new products replace old recommendations, so the list stays current. Oscar Liang's FPV drone build tutorial is another comprehensive reference covering DJI O4 and Walksnail digital systems.

Flight controller orientation diagram showing motor positions in a quadcopter frame
Motor orientation in a quadcopter: motors 1 and 4 spin clockwise, motors 2 and 3 spin counter-clockwise. Betaflight uses this mapping during configuration.

How to Build a Drone: Assembly Steps

Tools You Need Before Starting

  • Soldering iron: The only non-negotiable tool. A temperature-controlled station (Hakko FX-888D or TS101 stick iron) at 350-380C. Low-quality soldering irons cause bad joints that fail in flight.
  • Solder: 63/37 rosin-core, 0.8mm diameter. Lead-free solder requires higher temperatures and is harder to work with for beginners.
  • Hex driver set: M2 and M3 screws are standard in FPV frames.
  • Wire cutters and strippers
  • Multimeter: Test continuity and confirm no short circuits before powering up.
  • Battery smoke stopper: Limits current on first power-up to prevent damage from wiring errors.

Assembly Sequence

  1. Frame assembly: Install standoffs, thread arms, mount top plate. Check all screws are tight but not overtorqued (carbon fiber cracks).
  2. Motor mounting: Install 4 motors, route motor wires through arms. Confirm correct rotation direction marked on each motor.
  3. ESC wiring: Solder motor wires to ESC pads (any order; motor direction corrected in software). Solder battery lead to ESC power pads.
  4. FC installation: Mount flight controller on anti-vibration standoffs. Connect FC to ESC via ribbon cable or direct solder.
  5. Receiver installation: Connect receiver to FC UART port. Route antenna to clear motor noise.
  6. Camera and VTX: Mount camera at target angle (30-45 degrees for freestyle). Solder VTX to FC or ESC power rail.
  7. Smoke stopper test: Connect battery through smoke stopper. Check for smoke, excessive heat, or LED errors before removing stopper.

What to Expect During Assembly

A first build typically takes 6 to 12 hours spread over 2 to 3 sessions. Soldering the motor wires is straightforward. Soldering small components to FC pads (the UART pins) requires more precision. Take breaks. Bad solder joints from rushed work cause problems that are hard to diagnose later.

Tip: Tin all pads before soldering. Apply a small blob of solder to each pad, let it cool, then solder the wire to the pre-tinned pad. This gives cleaner joints than trying to solder wire and pad simultaneously.

Betaflight Setup: Configuring Your Drone After Building

What Betaflight Is and Why It Matters

Betaflight is the open-source firmware that runs on your flight controller. It handles motor mixing, PID control, OSD (on-screen display), failsafe behavior, and receiver protocol. You configure it through Betaflight Configurator, a desktop app that connects to the FC via USB. Every drone you build needs Betaflight configured before it's safe to fly.

Betaflight configuration is not optional. A drone with unconfigured failsafe settings can fly away uncontrolled if you lose signal. This takes 30 minutes to set up correctly and should not be skipped.

Key Setup Steps in Betaflight

  1. Flash firmware: Download the latest Betaflight Configurator. Connect FC via USB (no battery). Flash the correct firmware version for your FC chip (F4 or F7).
  2. Ports tab: Enable the UART connected to your receiver (e.g., UART2 for serial RX).
  3. Configuration tab: Set receiver protocol to CRSF (for ELRS). Enable DSHOT600 for ESC protocol. Set motor idle throttle to 5-7%.
  4. Receiver tab: Confirm all channels respond correctly to stick movement. Assign switch channels for arm, beeper, and flight modes.
  5. Motor tab: Spin each motor individually (no props) to verify rotation direction. Reverse any motor spinning wrong way via BLHeli configurator.
  6. Failsafe tab: Set failsafe to disarm after 1 second of signal loss. This is critical.
  7. Modes tab: Assign the arm switch. Set angle mode or acro (angle for beginners, acro for freestyle).

First Flight Checklist

  • Fly in a large open area with no people nearby
  • First hover at 1 meter for 30 seconds to check for oscillations
  • Test failsafe by turning off transmitter: drone should disarm immediately
  • Check motor temps after first flight: slightly warm is fine, hot is a problem
  • Check propeller tightness after each session until they stop loosening

For detailed Betaflight setup, the official Betaflight documentation and Joshua Bardwell's YouTube channel cover every step with current firmware walkthroughs. For ELRS receiver binding and configuration, the ExpressLRS Getting Started guide at expresslrs.org is the definitive reference.

PID Tuning After Your First Flight

PID (Proportional, Integral, Derivative) settings control how aggressively the flight controller corrects for unwanted movement. The defaults loaded when you flash Betaflight firmware are a reasonable starting point for a 5-inch build, but they are not optimized for your specific motor/prop/weight combination.

After your first hover test, if the drone oscillates (shakes or wobbles after a stick movement), the P value is too high. If it feels mushy and slow to respond, P is too low. The Betaflight Presets tab includes community-submitted tune profiles for common builds. Selecting a preset that matches your motor and frame combo gets you 80% of the way there without manual tuning. Full manual PID tuning is an advanced skill, but getting to a functional tune from a preset takes 20 to 30 minutes of hover testing.

FAQ

A budget 5-inch FPV drone costs $285-400 for the drone itself. Add a radio transmitter ($65-110) and goggles ($60-200) and your total first-build investment is $500-700 for an analog setup. A digital FPV system using DJI O4 runs $1,200-1,800 for everything. These prices assume buying individual components, not a pre-selected kit.

Yes. Soldering is required for connecting motors to the ESC, wiring the battery lead, and connecting small components to flight controller pads. It's not difficult to learn, but you need a decent temperature-controlled iron and some practice before starting your build. Watch 30 minutes of beginner soldering videos before attempting it.

At the sub-$300 level, buying wins on pure cost. At the $500-1,000 range, building gives you similar flight performance for similar money, plus repairability. Where building wins long-term: replacement parts cost $3-30 per component instead of sending the drone in for service. After one serious crash, the repair savings cover much of the build cost.

A 5-inch freestyle quadcopter is the most-recommended first build. The parts ecosystem is the largest of any size class, tutorials are everywhere, and Betaflight has well-documented defaults for 5-inch builds. Start with a 4S battery system rather than 6S for a lower learning curve on tuning and power management.

Plan for 6 to 12 hours of physical assembly spread over 2-3 sessions, plus another 2-4 hours for Betaflight software configuration. Ordering parts takes 1-2 weeks if sourcing from multiple vendors. Most first-timers report a 3-4 week timeline from deciding to build to first flight.

Yes, if it weighs 250 grams or more. The FAA requires registration for all drones 250g and above regardless of whether they are commercially purchased or self-built. Registration costs $5 and is done through the FAA DroneZone at faadronezone.faa.gov. FPV freestyle builds almost always exceed 250g.

Betaflight Configurator is the primary tool for FC setup. You'll also use BLHeli Suite or BLHeli_32 to configure ESC settings and verify motor rotation. For ELRS receivers, the ExpressLRS Configurator is used to flash receiver firmware. All three are free and open source.

ExpressLRS (ELRS) is an open-source radio control protocol that has become the dominant standard for FPV drones as of 2024-2025. It offers very low latency (2ms at 500Hz packet rate), long range, and is significantly cheaper than older FrSky or Spektrum receivers. For any new build, ELRS is the recommended choice. You need an ELRS-compatible transmitter (like Radiomaster) and an ELRS receiver for the drone.

Paul Posea

Paul Posea

Author · Dronesgator

Paul Posea is the founder of Dronesgator and has been reviewing and comparing drones since 2015. With a Part 107 certification, 195 YouTube drone reviews, and published work on Digital Photography School, he combines hands-on flight testing with data-driven analysis to help pilots find the right drone.